If you’ve deployed or are looking to deploy ClearPass in AWS, a common question that gets asked is if you need to also configure a load balancer. This goal of this post is discuss the pros and cons of an Elastic Load Balancer (ELB) and the necessary steps to deploy one.
Do I Even Need a Load Balancer?
Deploying a load-balancer to front-end multiple ClearPass nodes has many advantages. This has been standard practice in large campus deployments for many years. With the migration of service including identity to the cloud, many customers have started to move authentication services, like ClearPass, into the cloud as well. As best practice it’s always recommended to deploy the authentication service close to the identity source.
The type of ClearPass deployment and what services are enabled will ultimately determine if/when a load-balancer is required. If the primary use-case if for web authentication or client on-boarding, then a load-balancer configured specifically for web traffic is a good option. When it comes to Radius and TACACS then the decision becomes slightly more complex.
With traditional load-balancers like F5, they have configuration options specific to those types of AuthN services. For example, they can monitor the actual status of the radius requests to be used to verify the health status of each node. This means that it doesn’t require a node to go hard down for it to be removed from the list of available servers. If for example the node is up but the connection to the back-end identity source fails, the box would technically be up but would not be able to authenticate any new users. A traditional load-balancer could detect this and take that node out of service.
In the case of the Elastic Load Balancer (ELB) service in AWS there are some design considerations to be aware of. The first is the health checks are limited to TCP/HTTP/HTTPS. This is perfectly fine if the main deployment of ClearPass is to support Guest or on-boarding workflows. If the use-case is Radius or TACACS, then ELB is unable to monitor those specific services. If the node was up but the connection to the back-end identity source failed, ELB would not be able to detect that type of failure. That said, if a node were to stop completely, the health check would fail and be taken out of the available list of servers. The other consideration is around persistency of the connections from the network devices. Traditional load balancers offer many configuration options to influence how “sticky” the connection is tied to a specific node. While ELB does support this feature, it’s just a checkbox.
Given these design considerations, for the majority of use-cases an ELB service would still provide great benefits to an AWS ClearPass deployment. In the following section, I’ll walk you through the basic steps to configure an ELB service for ClearPass in AWS.
Before You Begin
Please go through the ClearPass deployment guide to understand how to deploy Policy Manager in AWS. https://www.arubanetworks.com/techdocs/ClearPass/TechNotes/ClearPass_Policy_Manager_AWS/index.htm
If you are unfamiliar with the ELB service in AWS, please review the deployment documentation.
https://docs.aws.amazon.com/elasticloadbalancing/latest/network/introduction.html
Steps to Configure an ELB service for ClearPass
To configure an ELB service for ClearPass nodes in AWS, complete the following steps:
Step 1: Deploy ClearPass nodes in AWS
Step 2: Configure Target Groups
Step 3: Configure Load Balancers
Step 4: Test and Verify all nodes are healthy and the ELB service is working
Step 5: Configure the network devices
Step 1: Deploy ClearPass nodes in AWS
Follow the steps in the ClearPass Policy Manager in AWS Guide: https://www.arubanetworks.com/techdocs/ClearPass/TechNotes/ClearPass_Policy_Manager_AWS/index.htm#AboutRelease/Overview_Intro.htm
- Create the VPC
- Attach the VPN Gateway or Direct Connect
- Deploy the ClearPass AMI in the VPC
- Verify each ClearPass node is up and reachable via their Elastic IP
- Run any post deployment tasks
- Run the “system morph-vm” command from the CLI (Please don’t skip this step)
- Apply licenses and upgrade if necessary

Note: An ELB does support ClearPass nodes deployed in different AZs however they must be within the same Region.
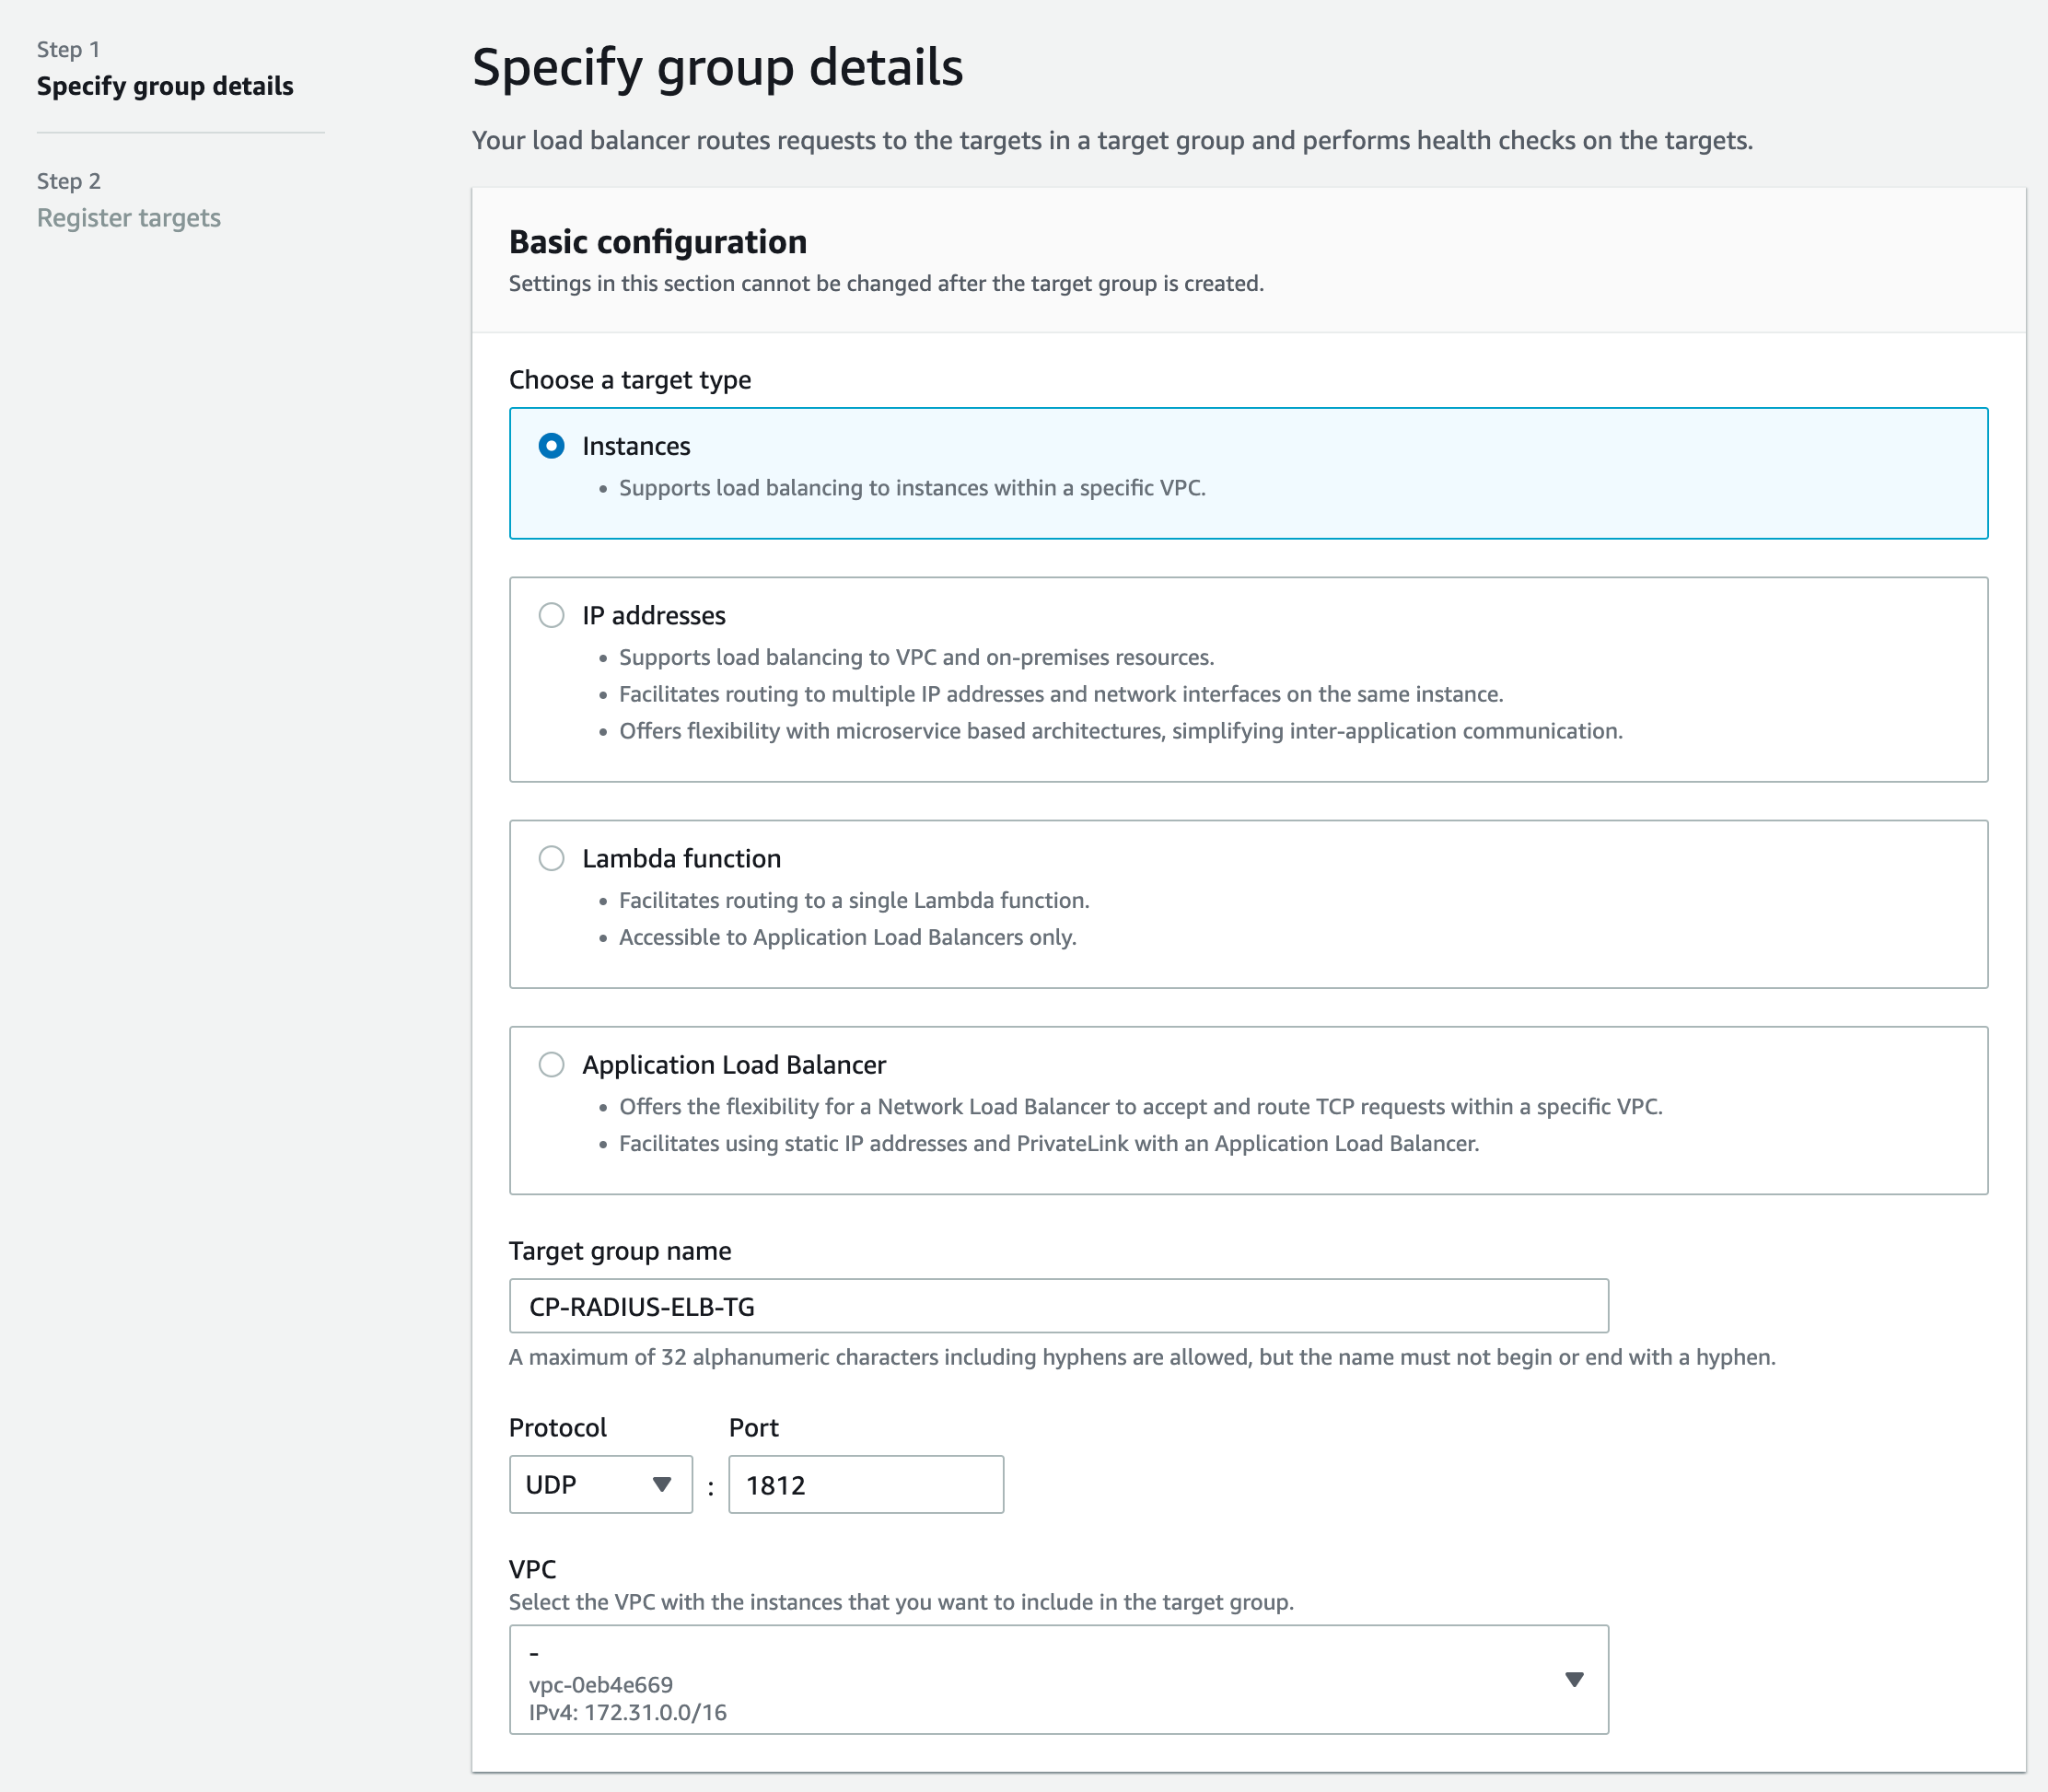
Step 2: Configure Target Groups
Target Groups are used by AWS to define the ClearPass instances which will be included in the ELB service.
- In AWS under EC2 > Load Balancing > Click Target Groups
- Click Create Target Group
- Set target type as Instance
- Enter a name for Target Group
- Protocol: UDP 1812
- Select the VPC that contains the ClearPass nodes
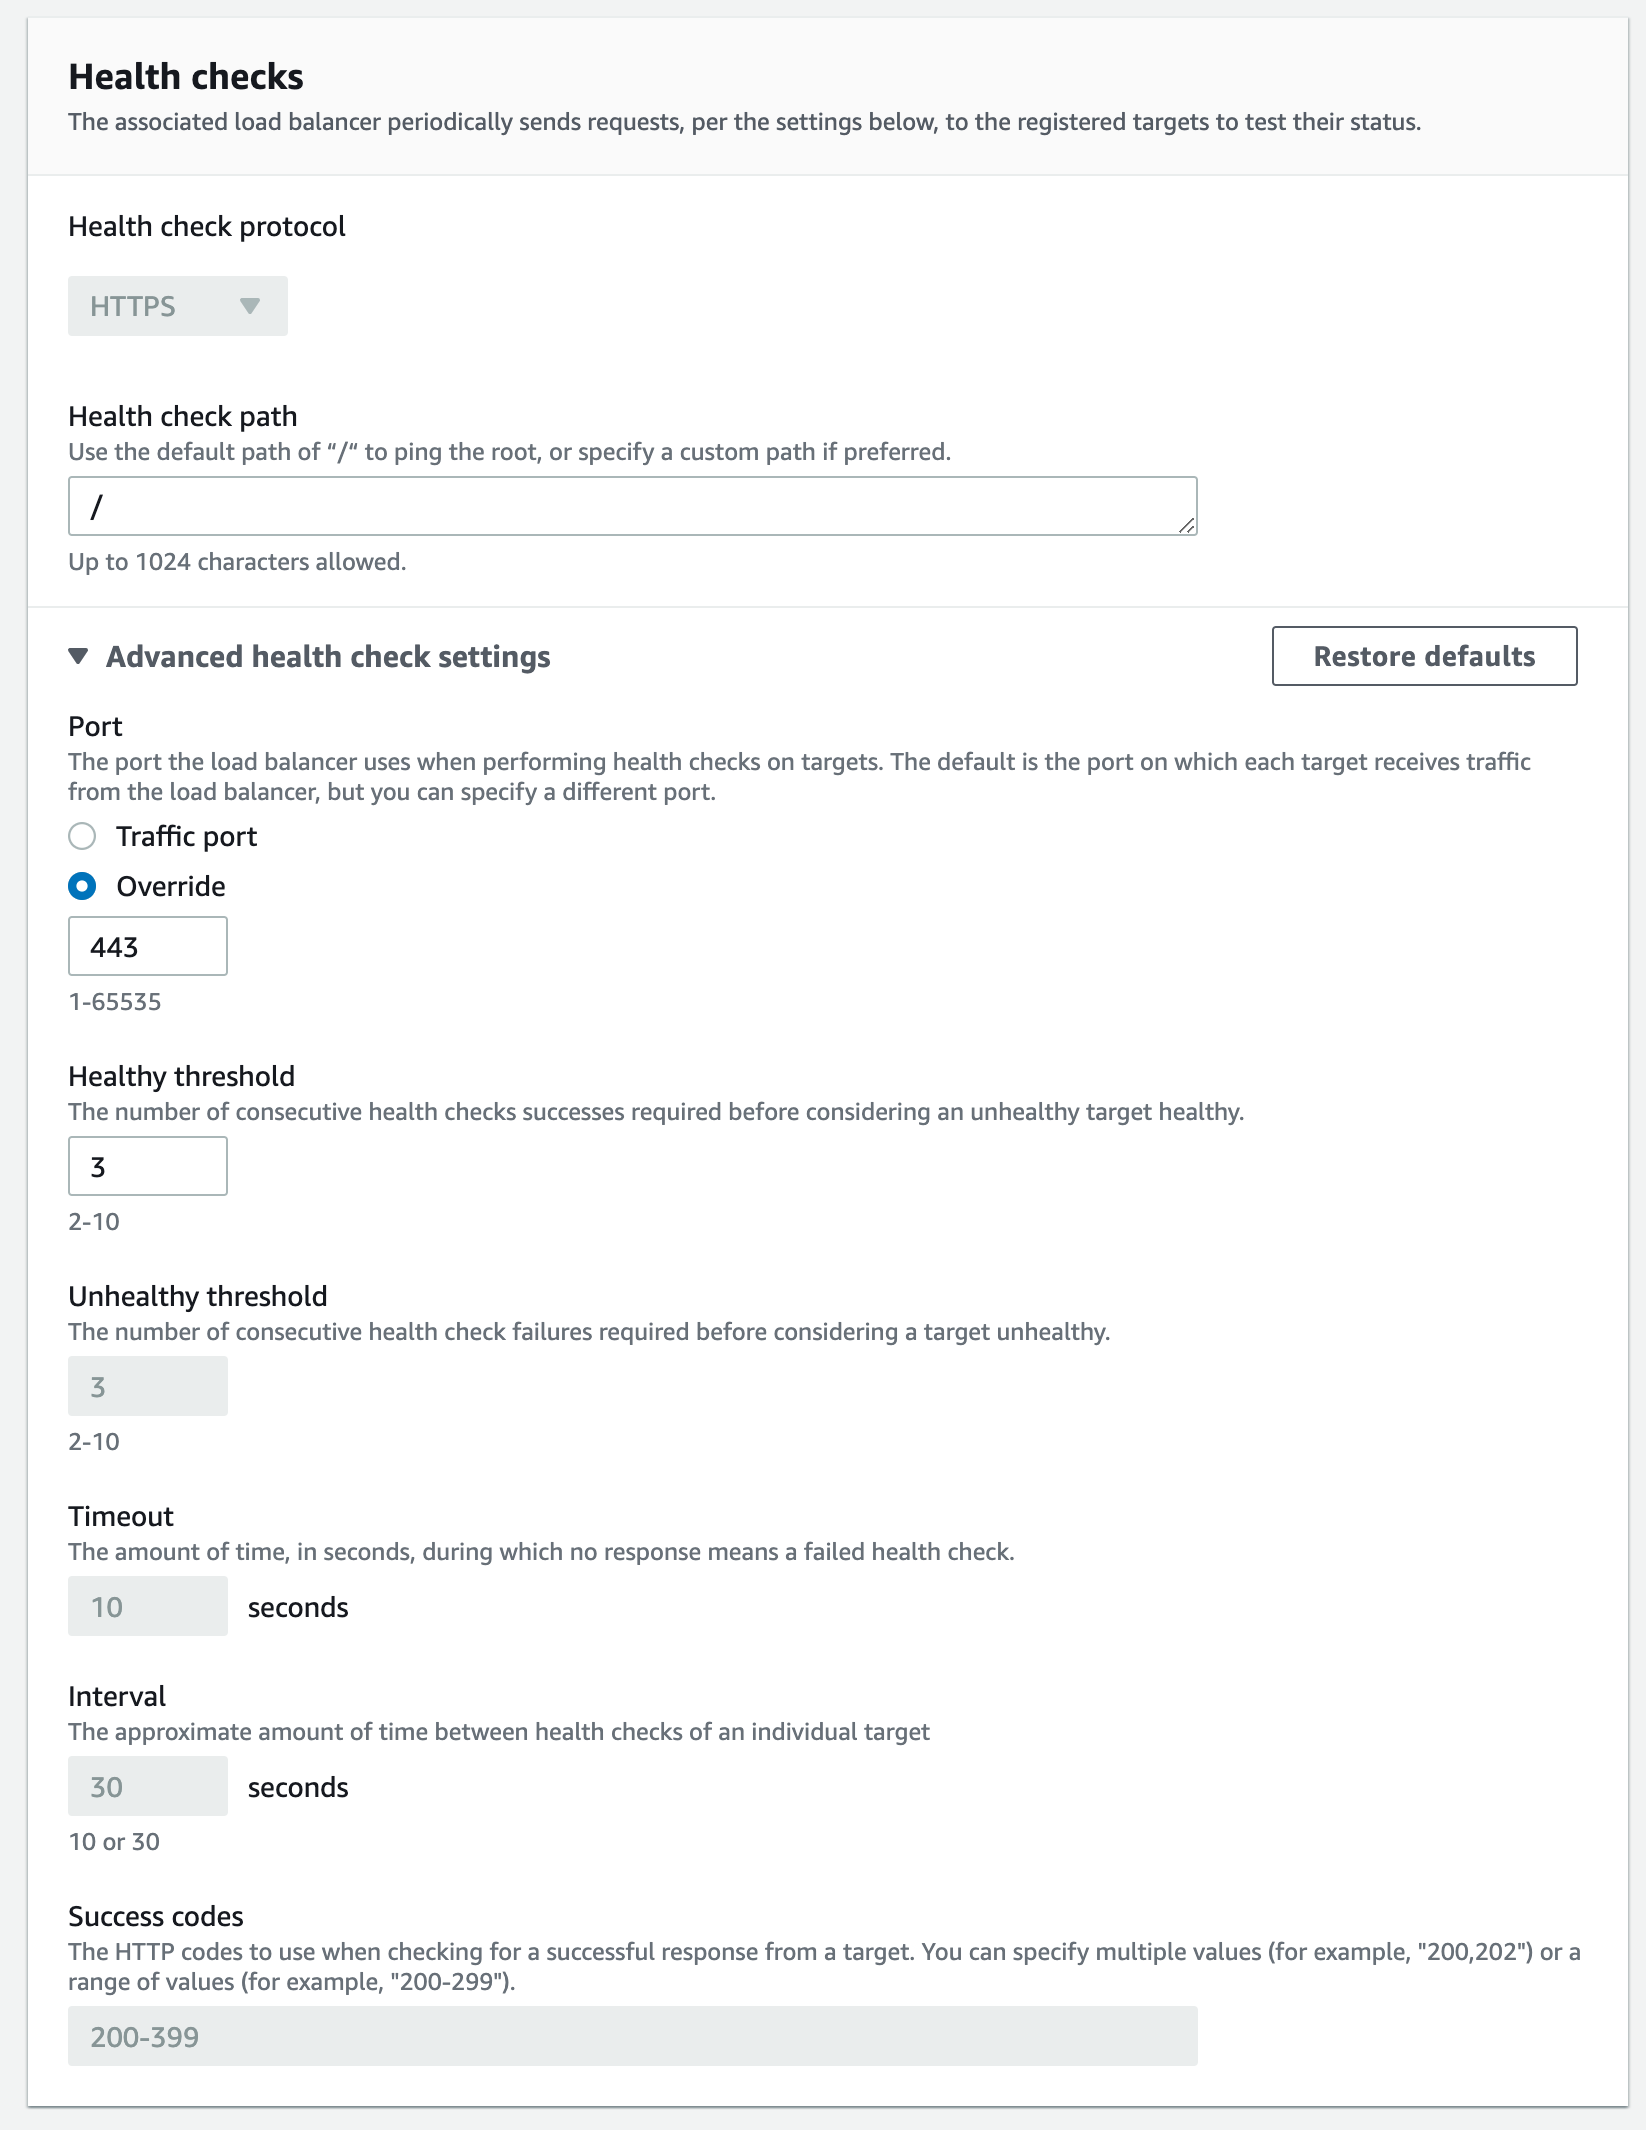
- Under Health checks select HTTP
- Click Next
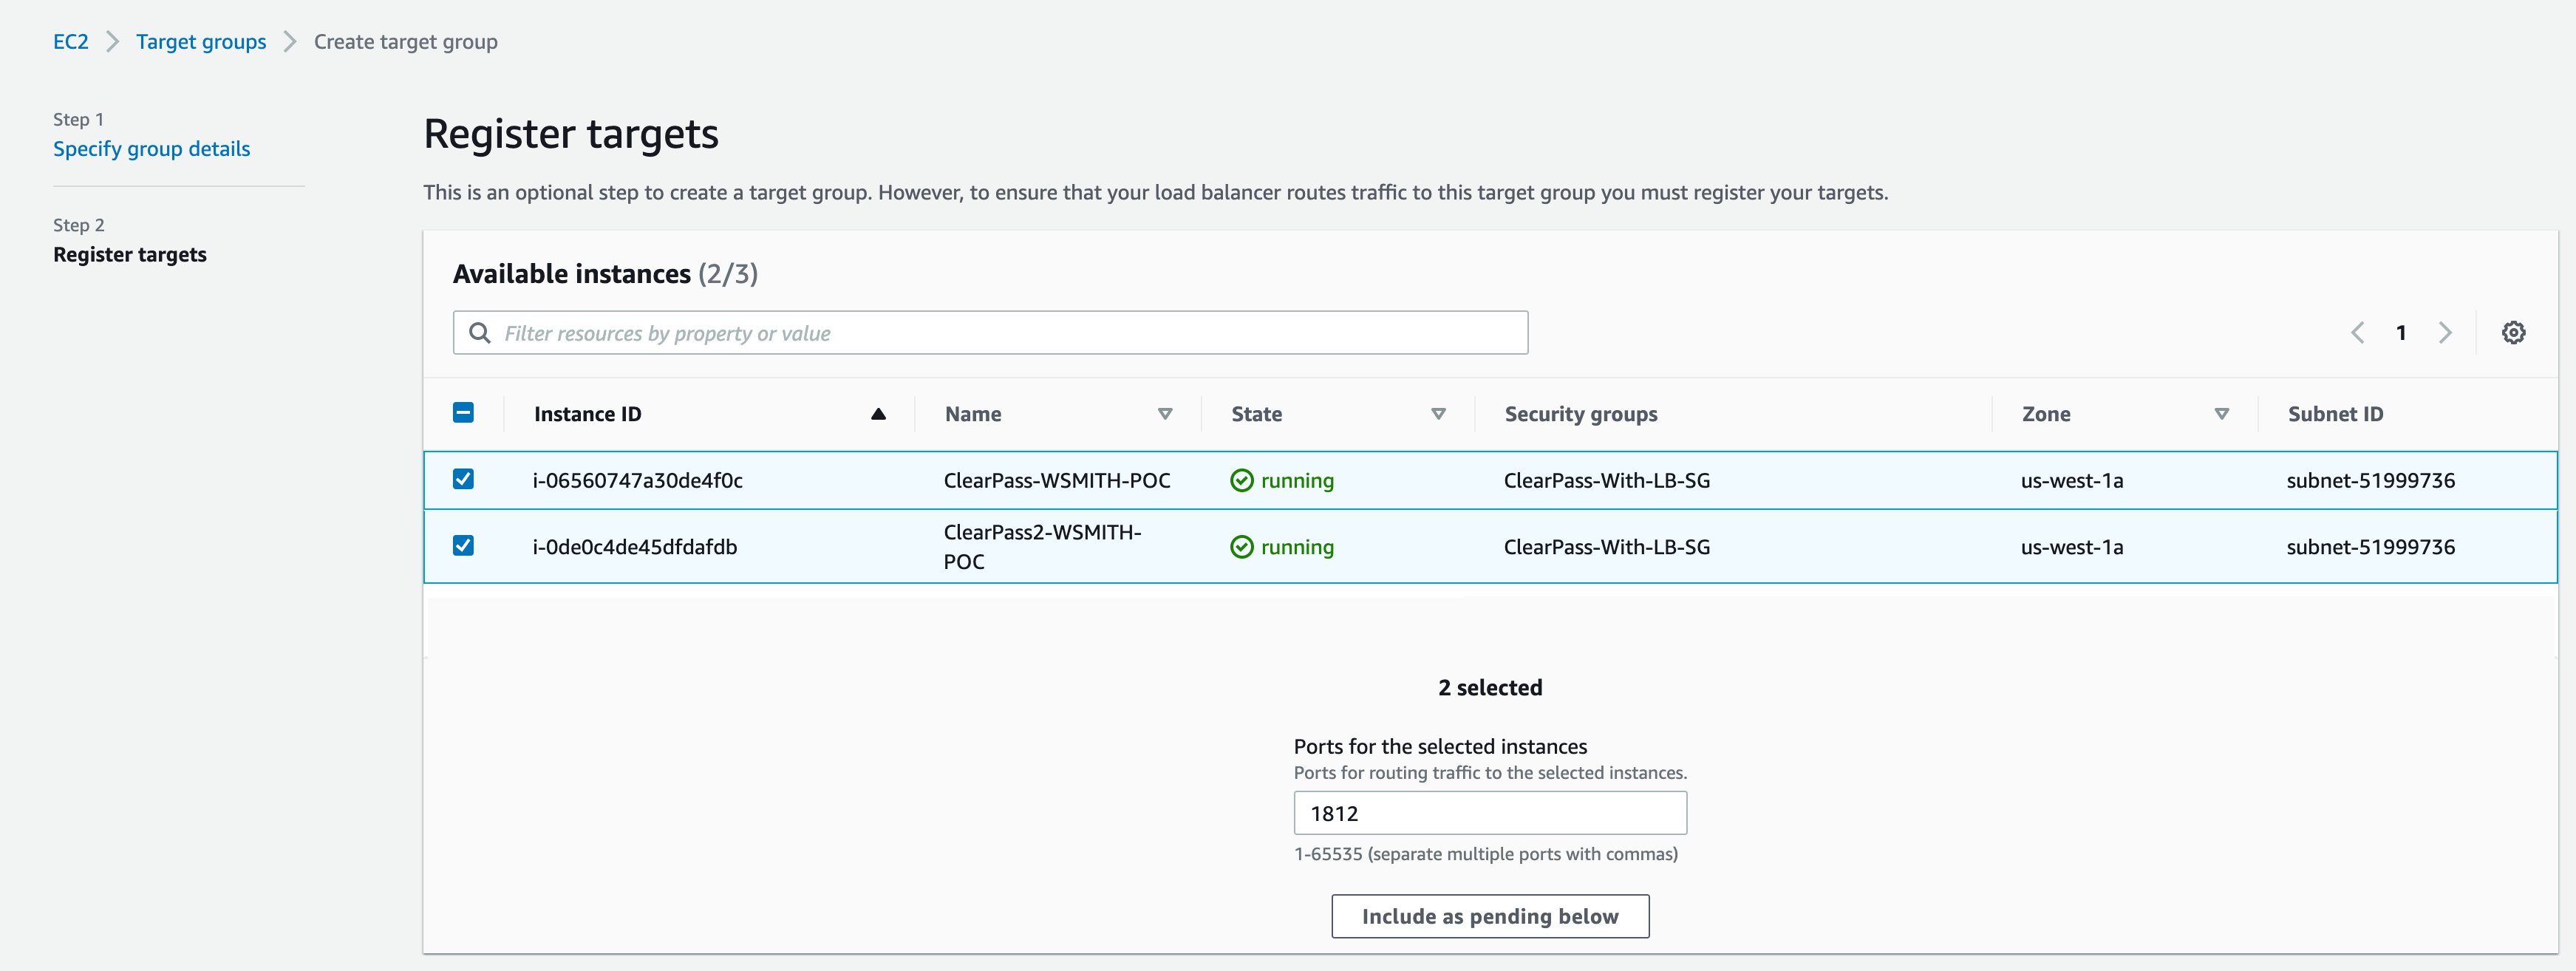
- Select each ClearPass instances as targets
- Verify port is 1812
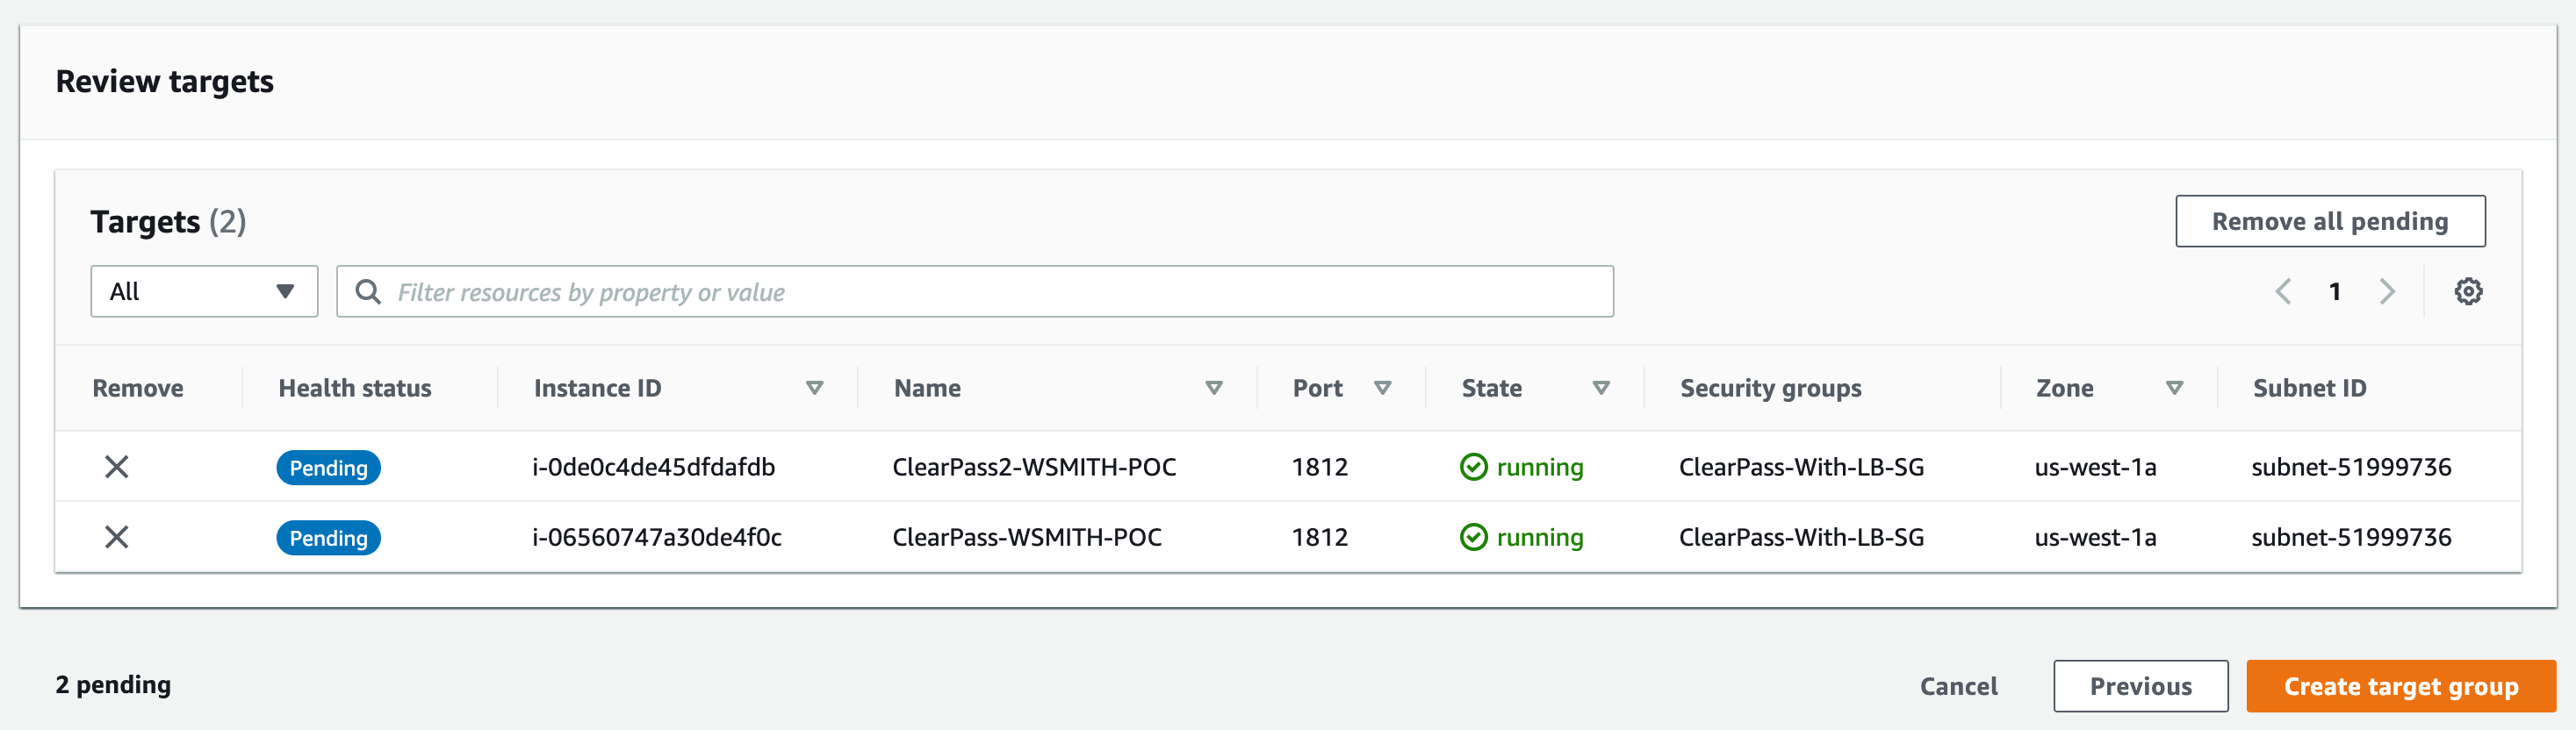
- Click include as pending below
- Then click Create target group
If Guest or Onboarding services are required, repeat the steps but change the protocol to TCP/443. If you select HTTPS it will force you to use an application load balancer. If you select TCP/443 you can use the same ELB you configured for Radius.
Follow the same procedure as above for TACACS, just change the protocol/port to TCP/49.
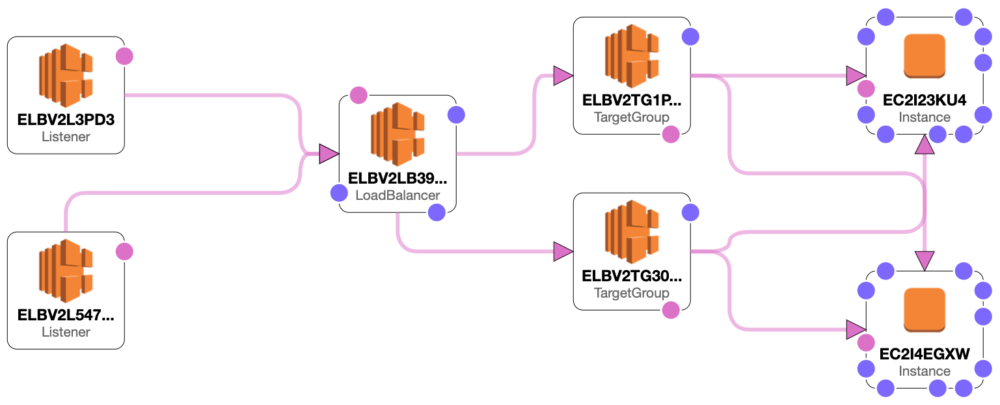
Step 3: Configure Load Balancers
-
The ELB configuration will define the listening ports and reference the above target group.
- In AWS under EC2 > Load Balancing > Load Balancers
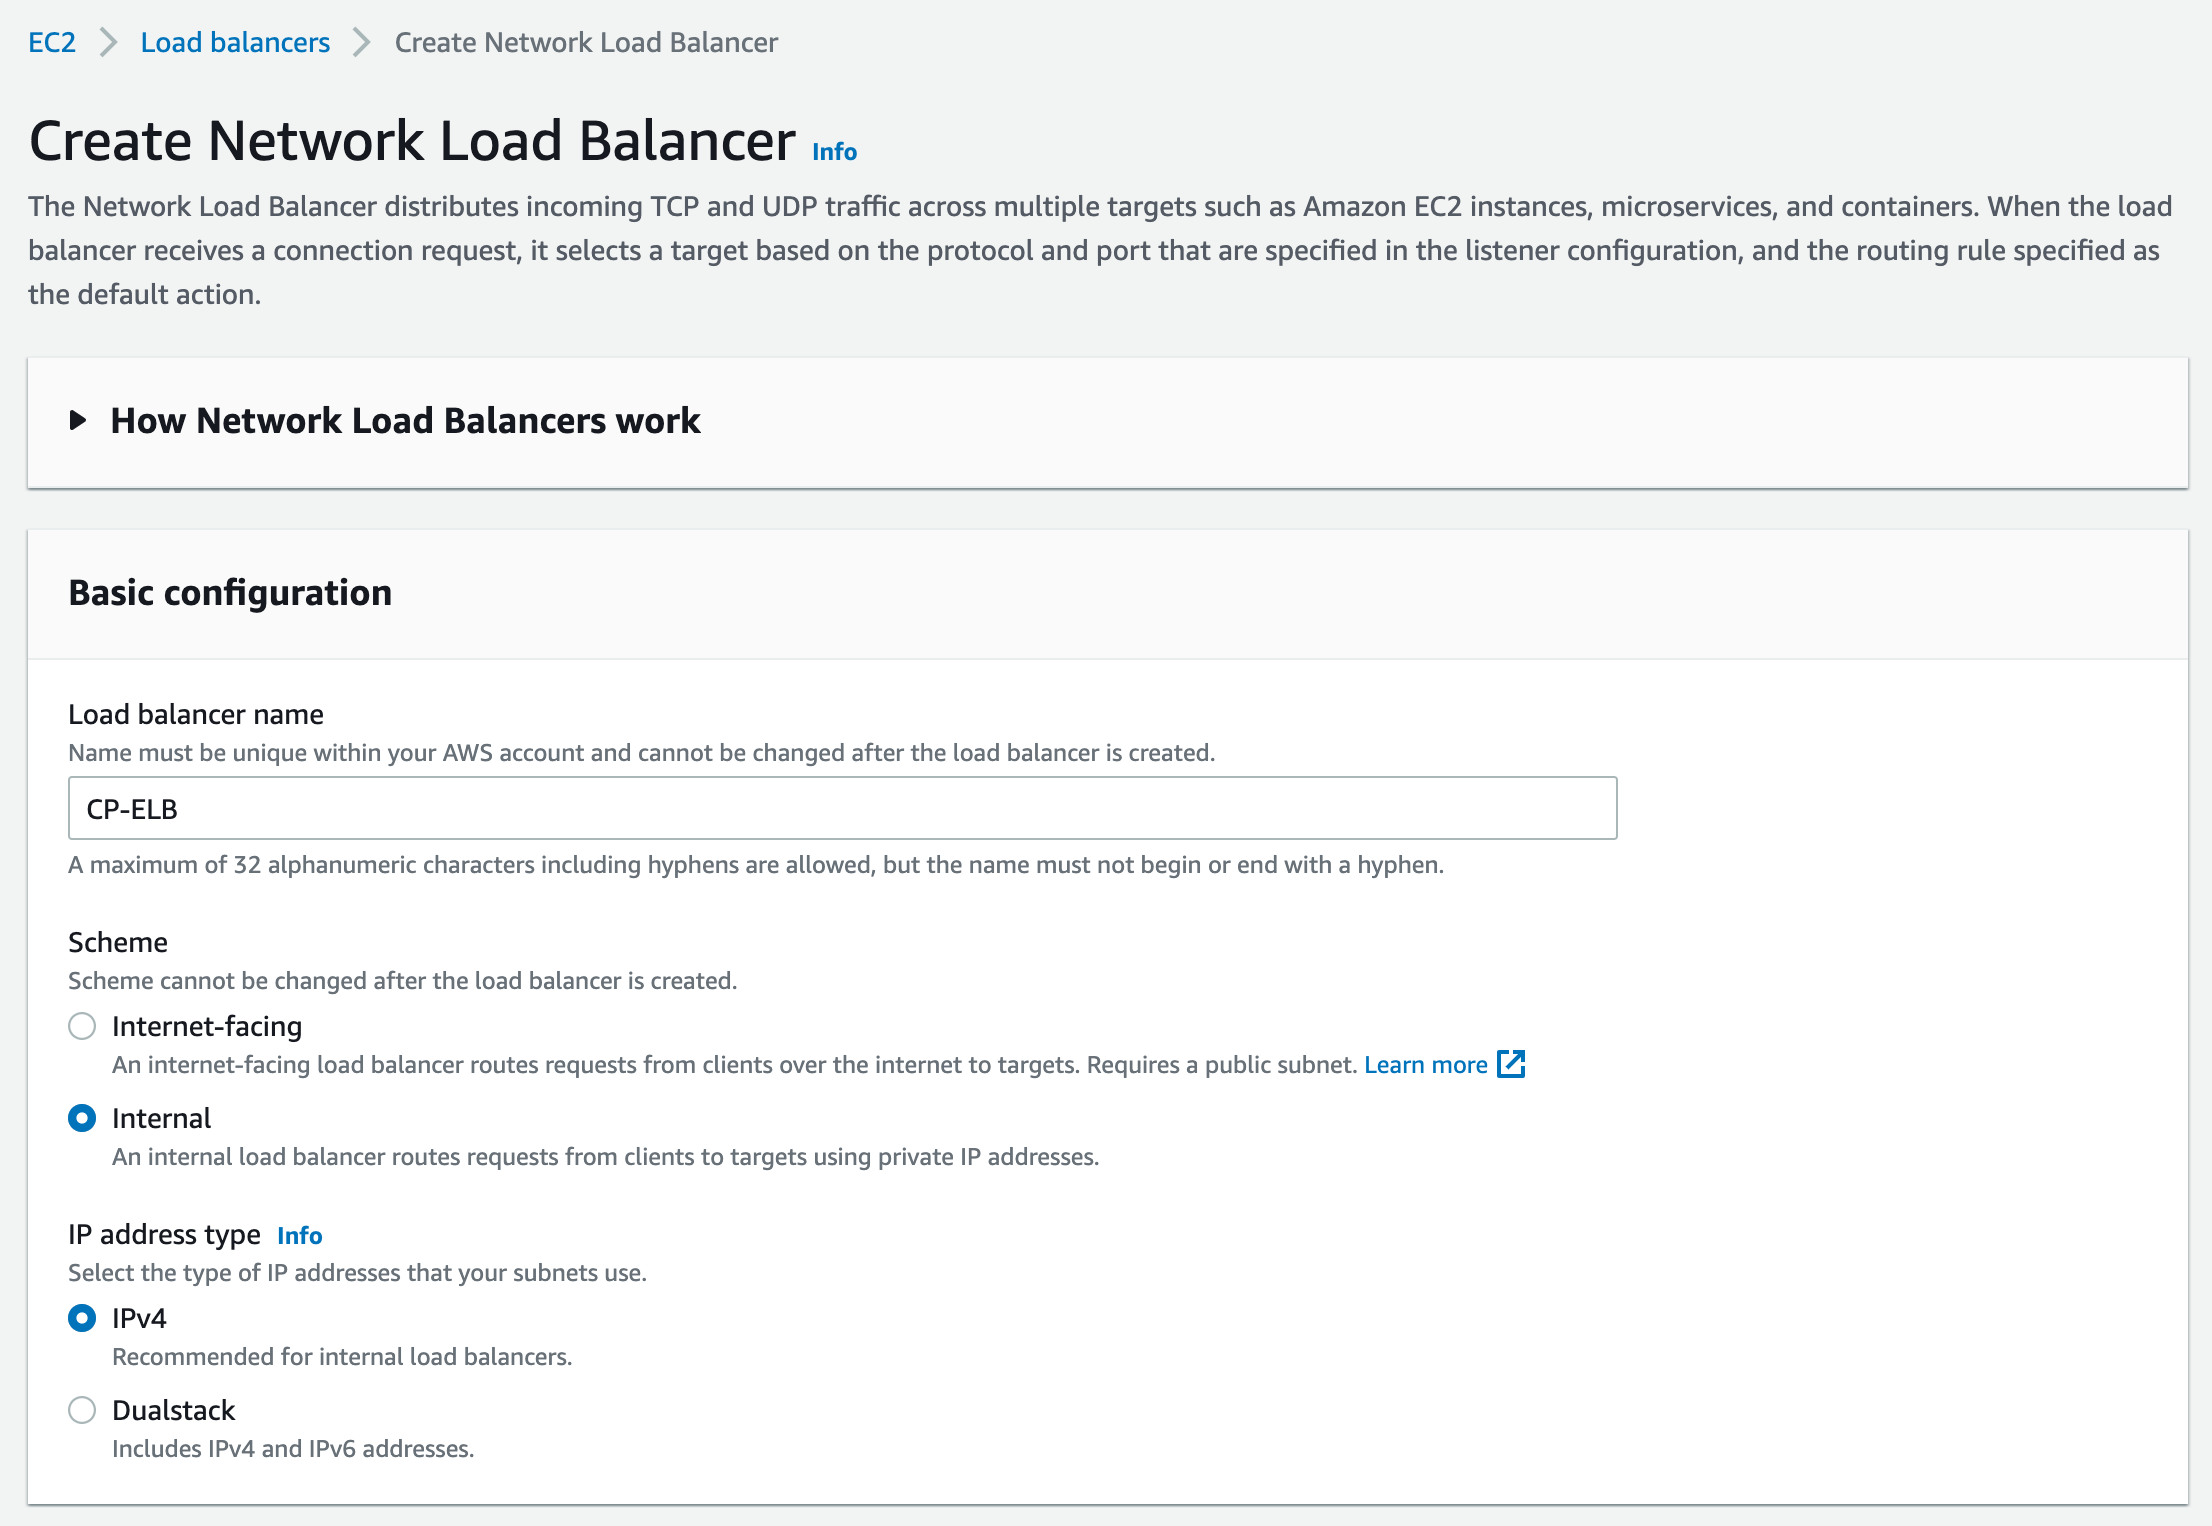
- Click Create Load Balancer
- Select Network Load Balancer and click Create
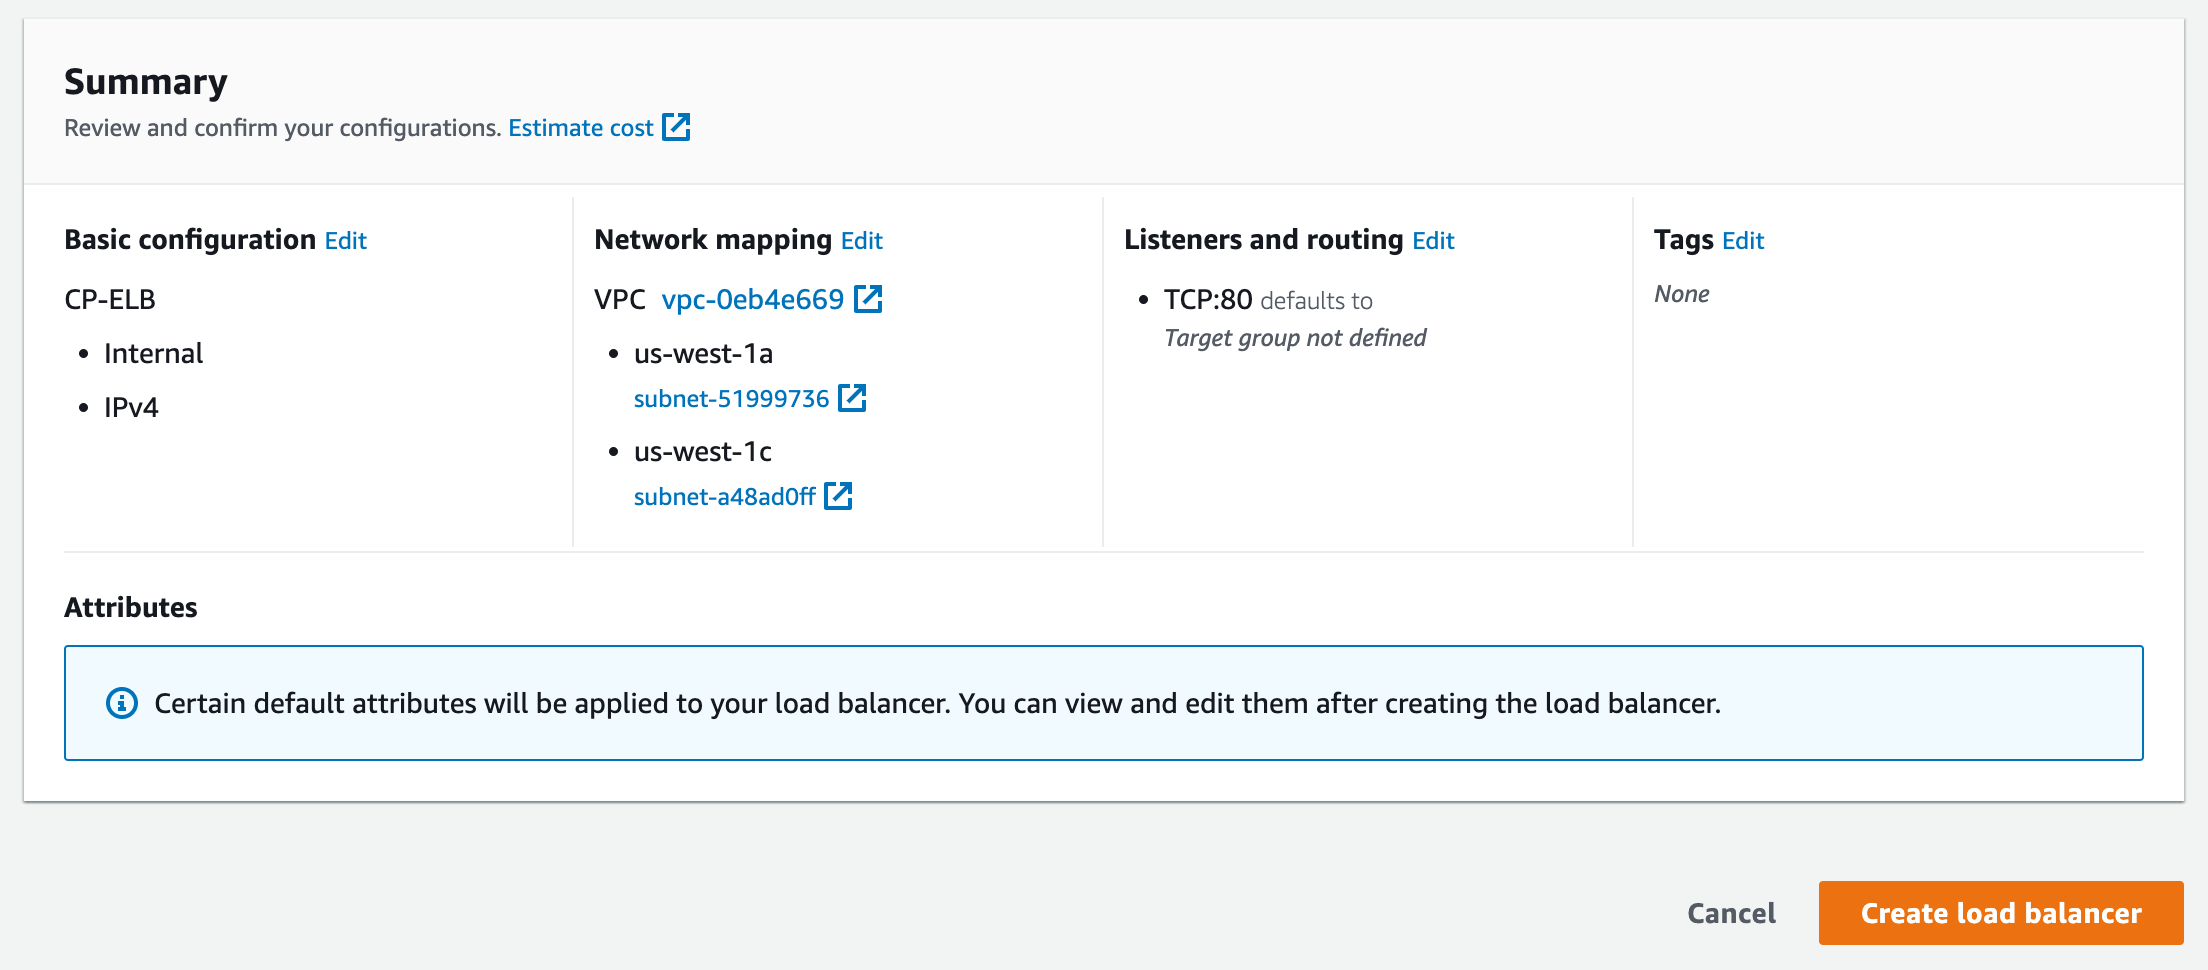
- Configure a name for the load balancer
- Select Internet-facing or internal depending on the deployment
- Select IP address type (IPv4 or Dualstack)
- Select the VPC where the ClearPass instances are deployed
- Select the AZs which those instances are deployed (if unsure select all)
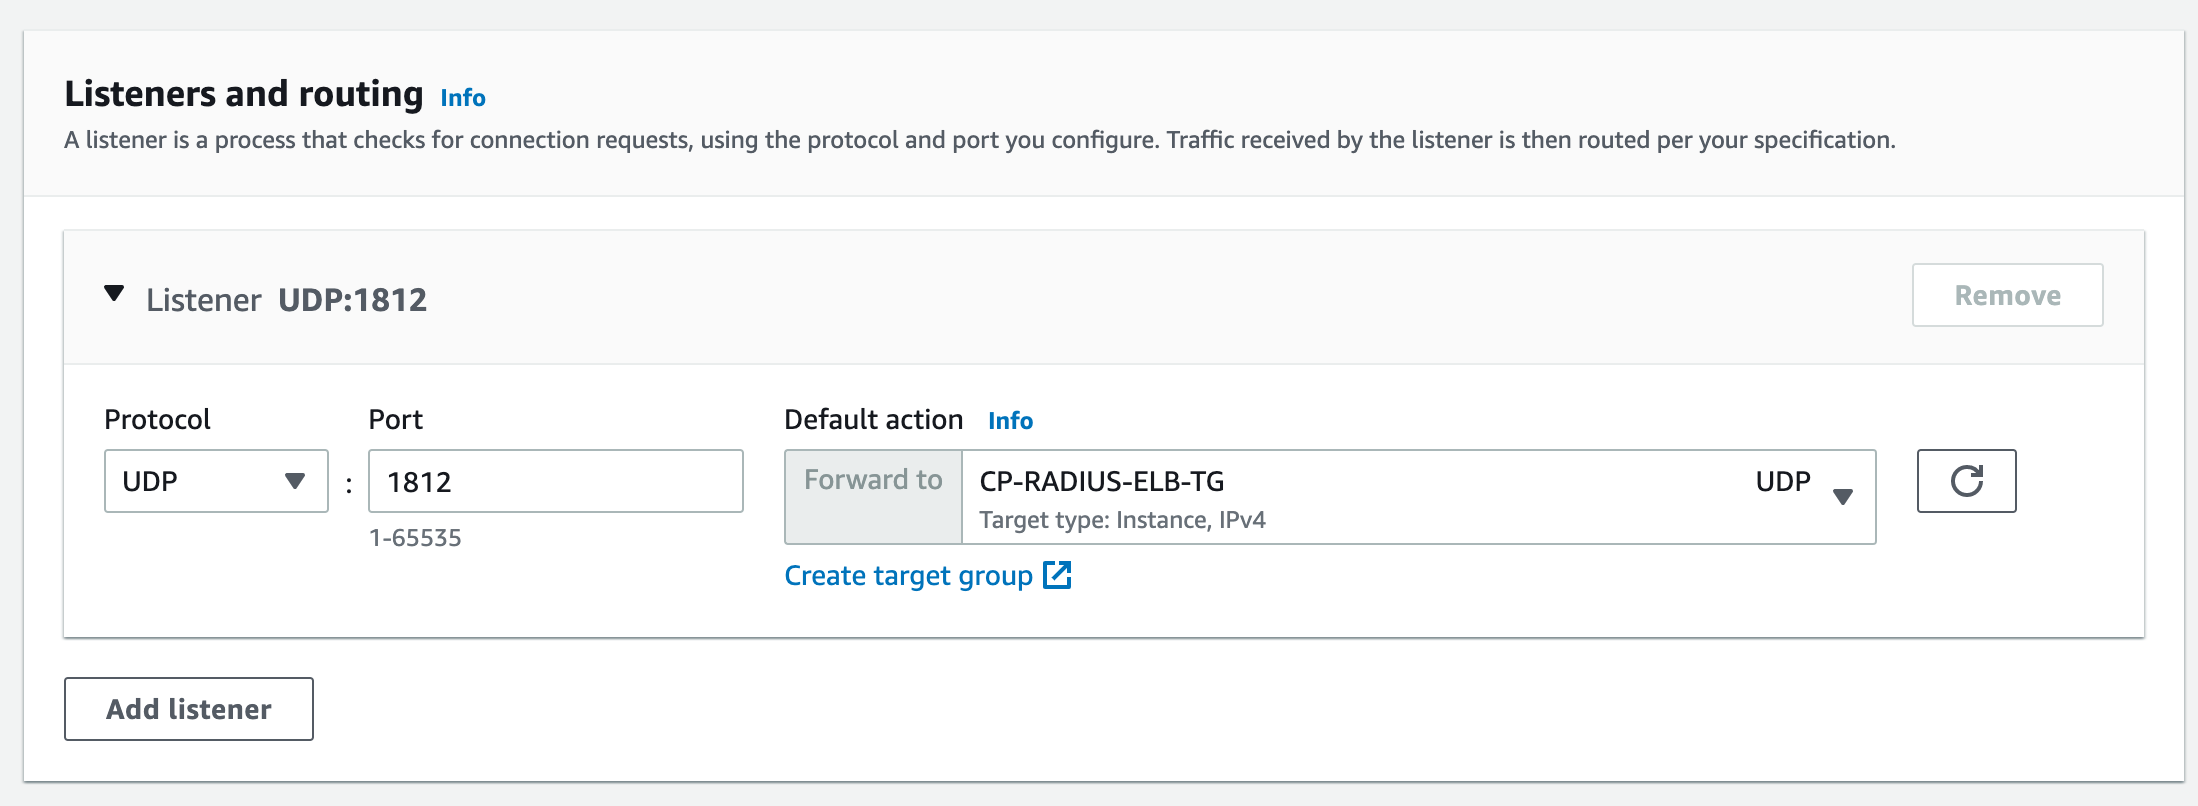
- Under Listeners and Routing select: UDP port 1812 and the previously configured Target Group
- Then click Add listener
- Finally click Create load balancer
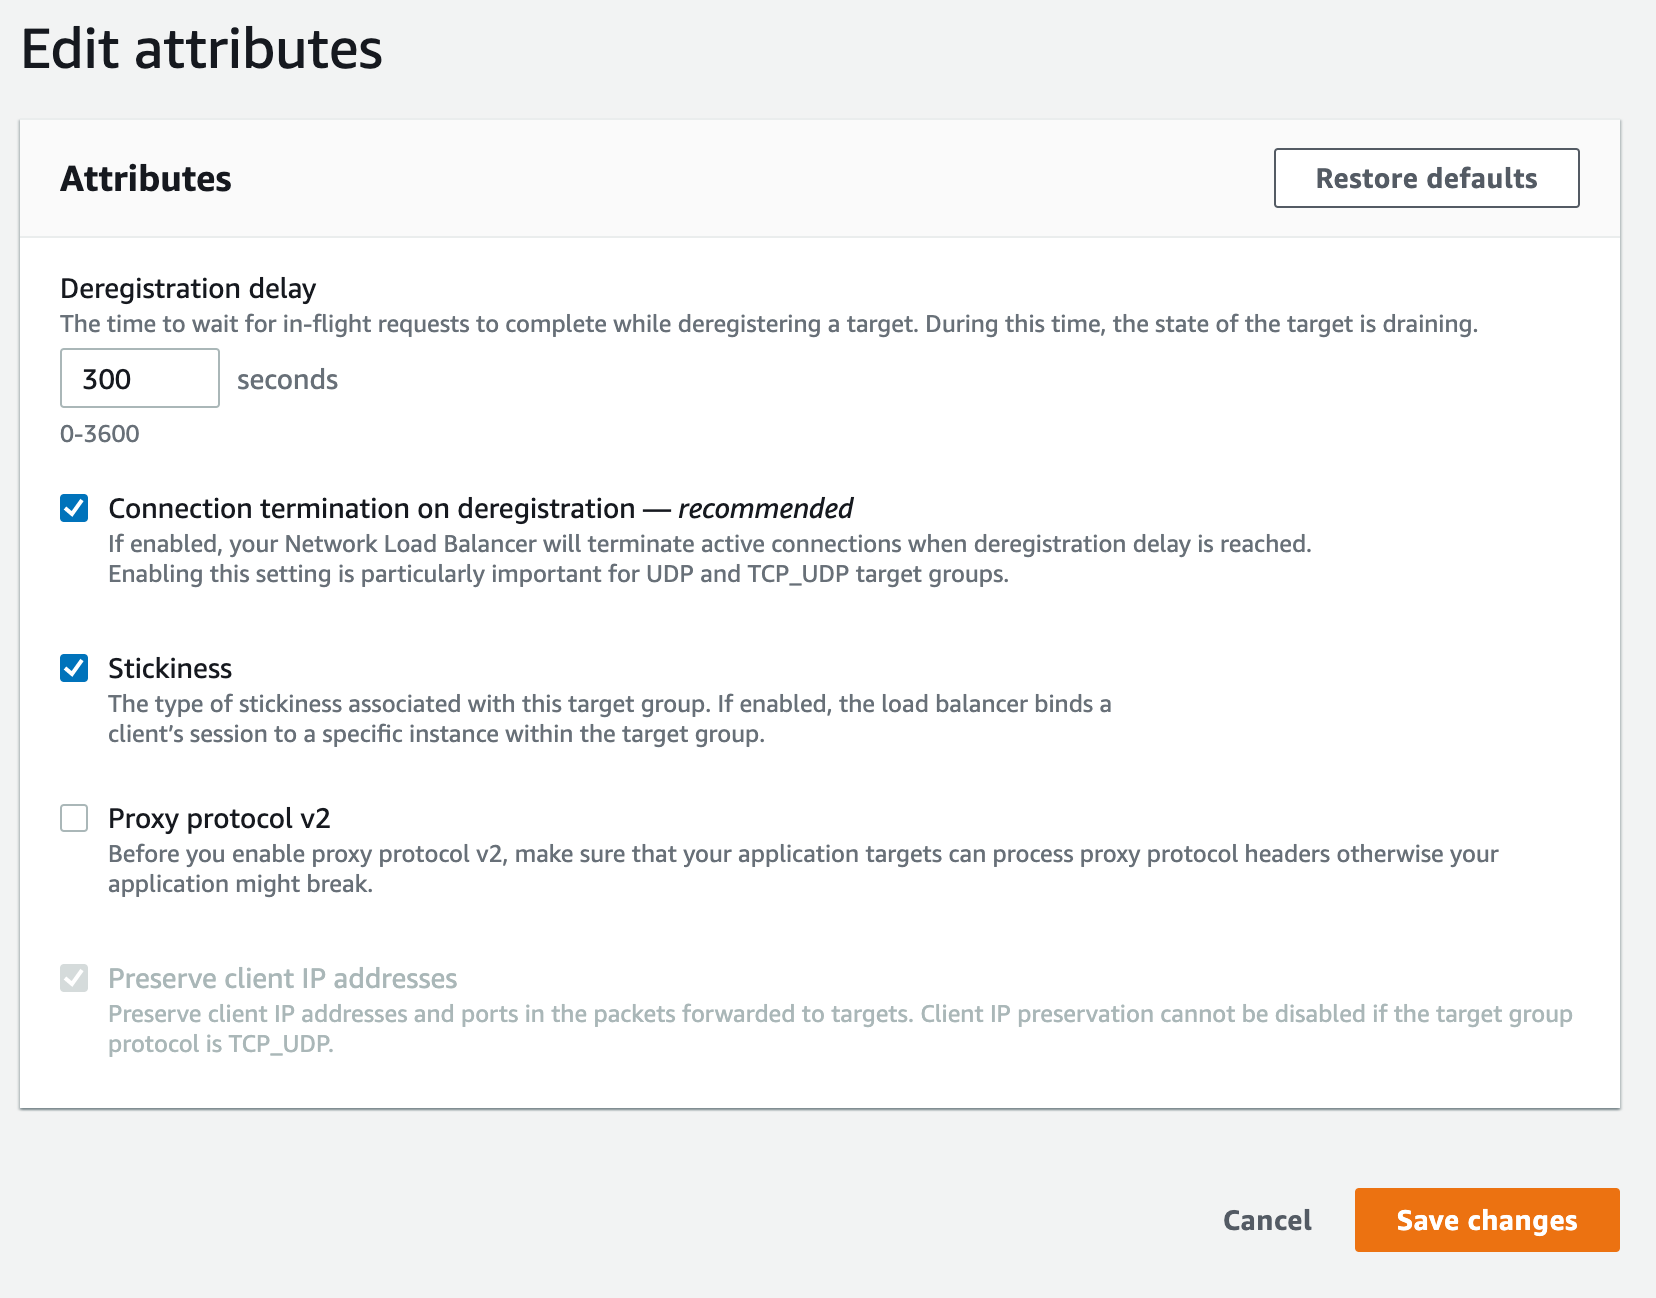
- After the ELB is created, click the ELB name and under the Attributes tab click Edit
- Verify that Stickiness is enabled and click Save changes
Step 4: Test and Verify
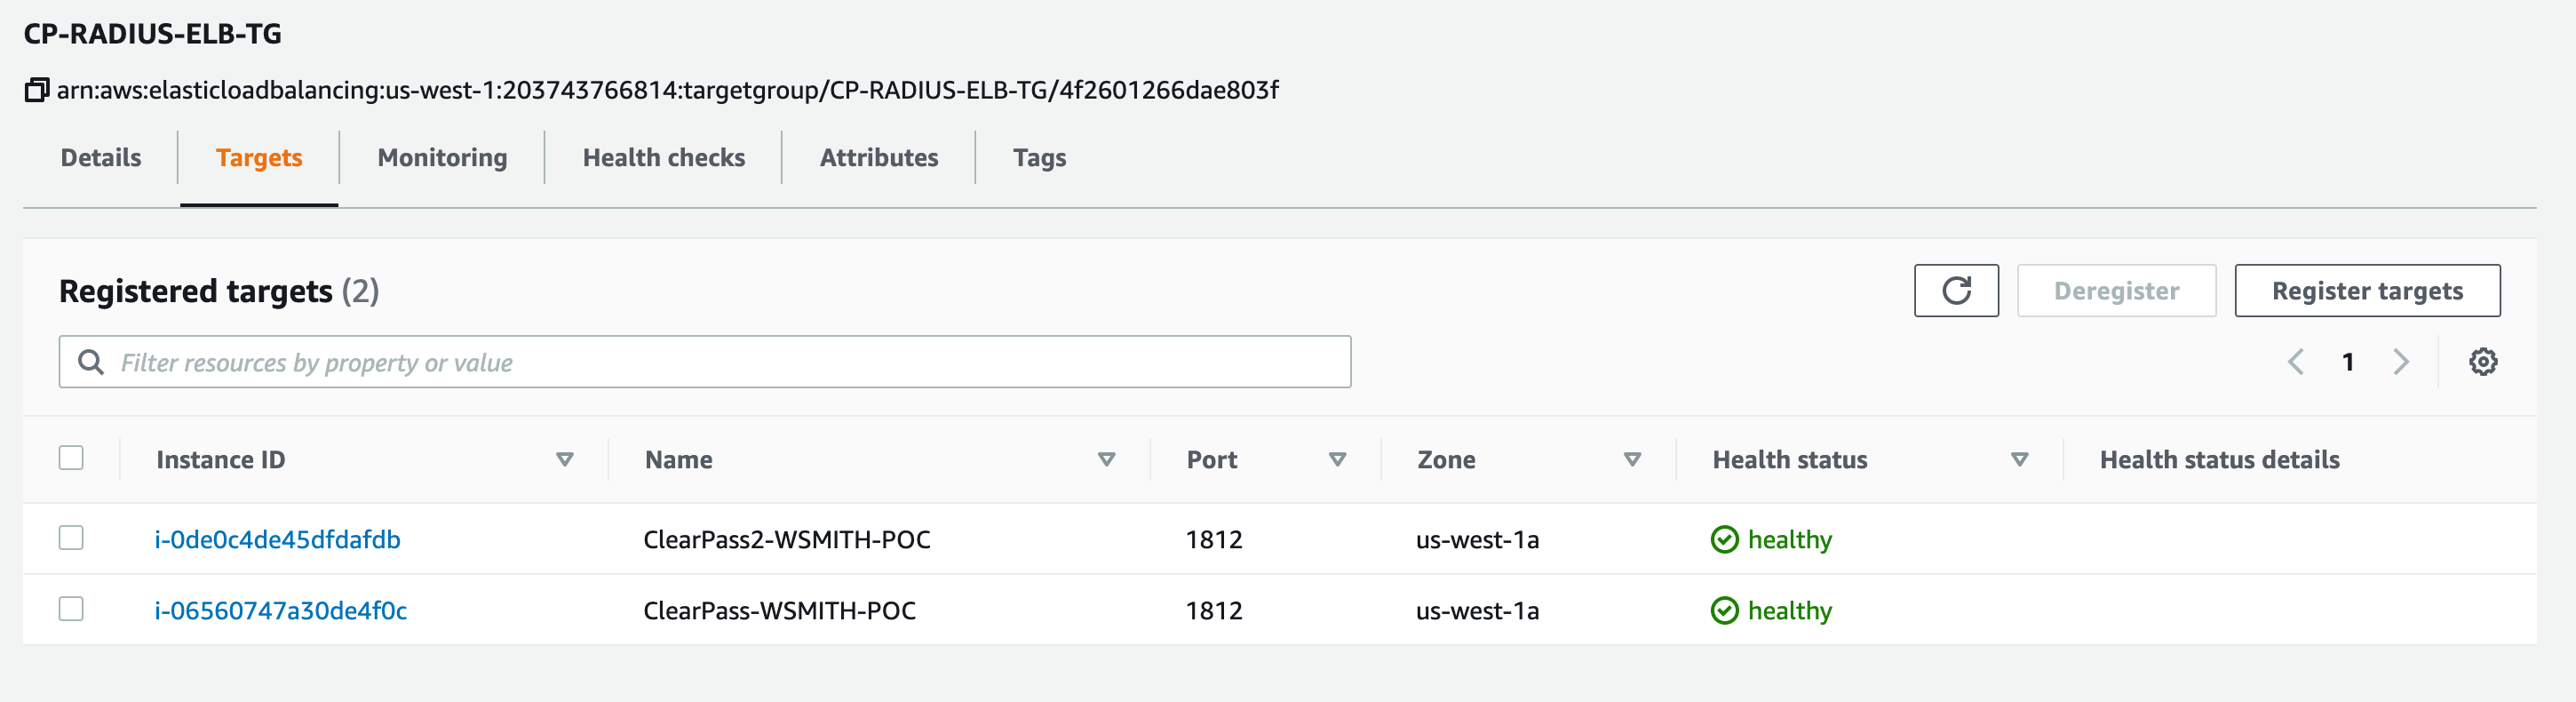
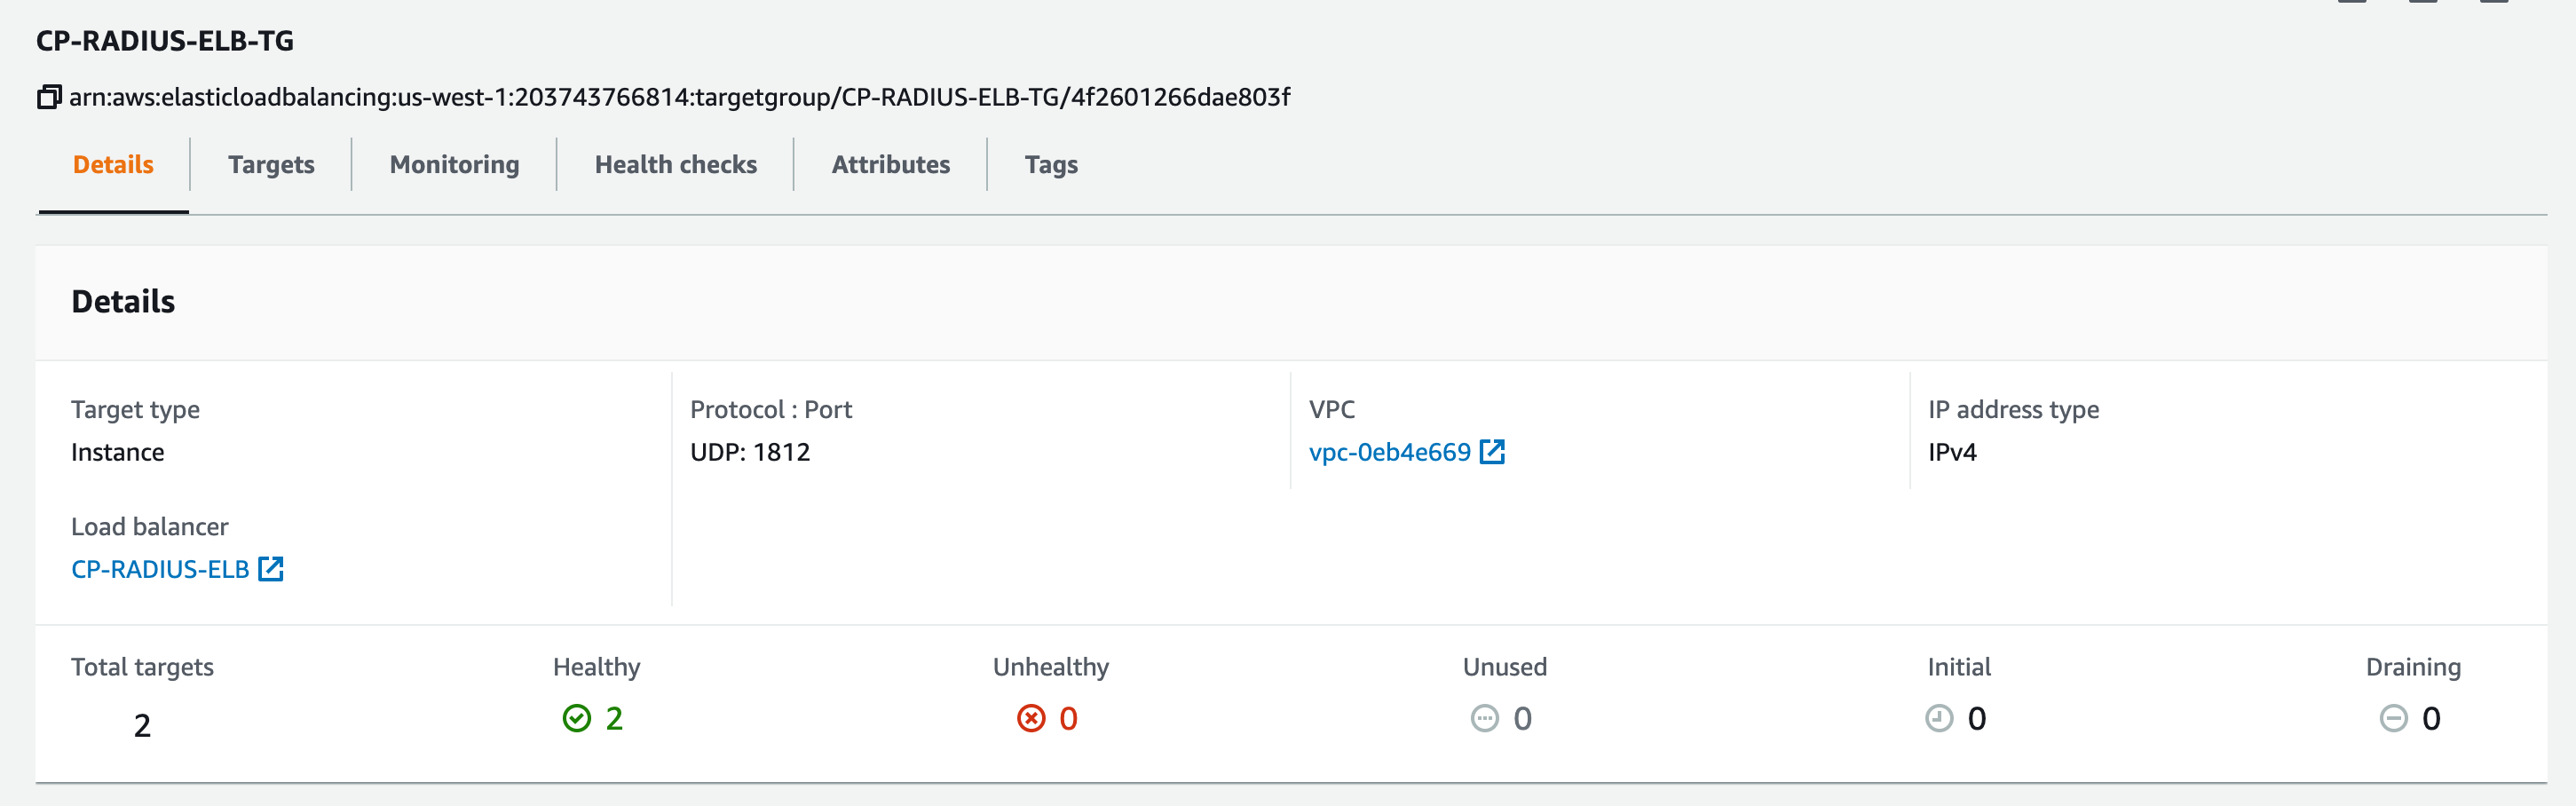
- In AWS under EC2 > Load Balancing > Click Target Groups
- Click the Target Group you created for ClearPass
- Verify that all nodes a listed and Healthy
- If a node is in the stopped state that will show as Unused
- If the health check fails that will show as Unhealthy
Other common issues to check:
Verify access issues by checking the applied security group and that traffic is permitted from the ELB to the ClearPass instances.
Verify the health checks are configured properly and they are testing for an open service in ClearPass such as HTTP/S.
Step 5: Configure the Network Devices
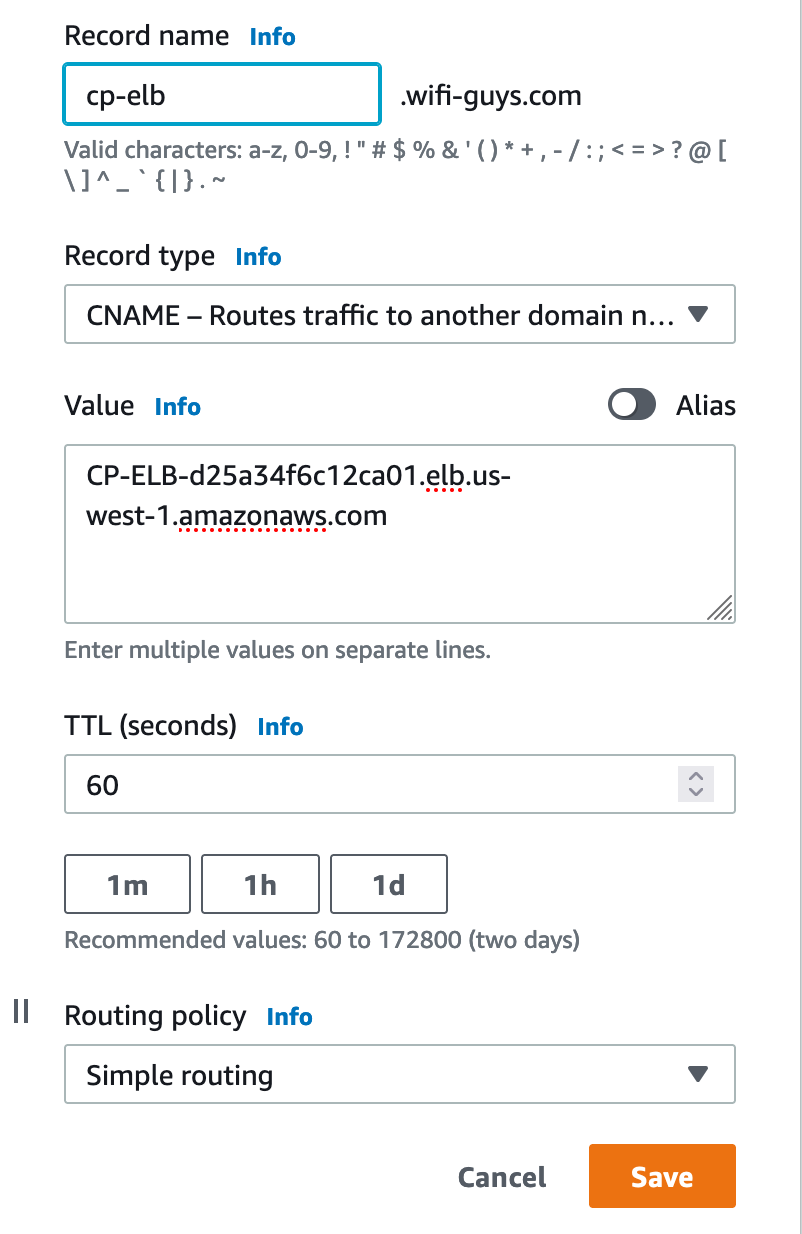
- In AWS under EC2 > Load Balancing > NOTE the DNS name.
- In your network device enter the DNS name for the RADIUS, TACACS or HTTP/S Guest or Onboarding source. If DNS is not supported, the resolving IP address will be fine. It will not change unless the ELB service is terminated.
- Finally test that the AuthN service is working and the request is being routed to one of the ClearPass nodes
This A Record will resolve to the IP of the ELB. Generally, most customers will likely create a simple CNAME that points to this record. IE “CP-ELB.CUSTOMER.COM”.